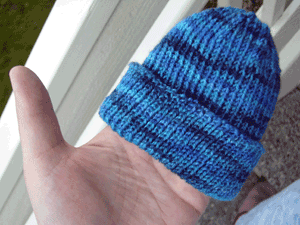
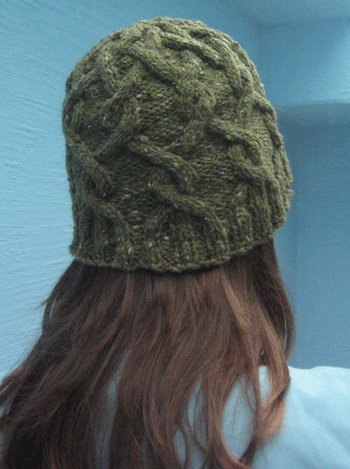
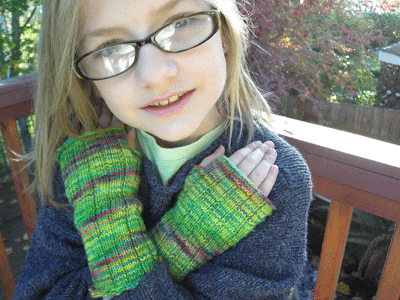
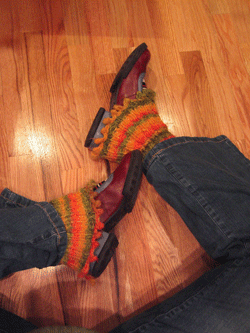
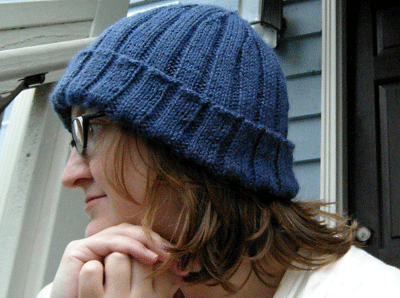
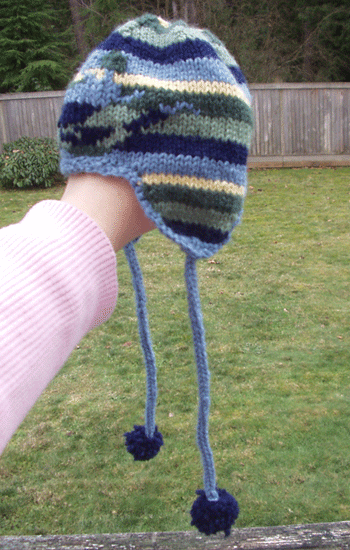
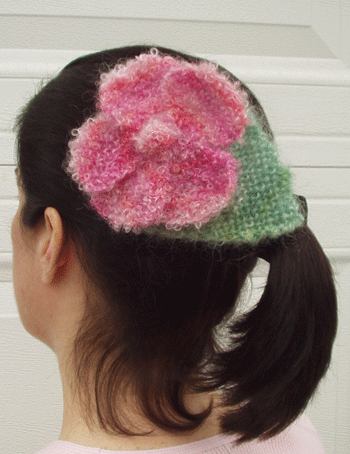
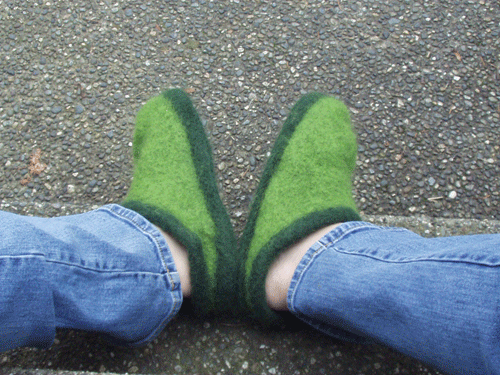
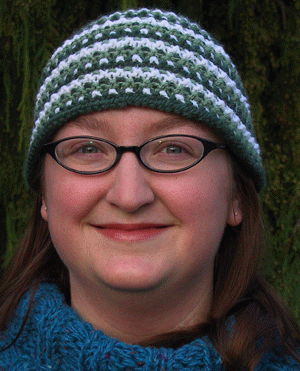
Archive for the ‘patterns/how to’ Category

Friday, November 16th, 2007

Angora mitts

angoramittfirst.gif

I wanted to get a better picture, or at least a new one, but that’s probably not going to happen, so I’m just posting this as is.

These are some fabulous fingerless mitts I designed in the style of the Uptown Boot Socks from the Winter 2003 issue of Interweave Knits Magazine.

Size 7 double pointed needles

Gauge- 13 stitches over 3 inches of stockinette

2 skeins Elsebeth Lavold Angora

Cable Pattern-

(C4F means place 2 stitches on a cable needle, hold cable needle in front while knitting the next 2 stitches, then return and knit the two stitches from the cable needle).

Round 1: knit
Round 2: knit
Round 3: (C4F, knit 4) around, end with C4F
Round 4: knit
Round 5: knit
Round 6: knit
Round 7: (knit 4, C4F) around, end with knit 4
Round 8: knit

Cuff-

Cast on 36 stitches, 12 per needle

Join into round, knit 20 rows of 2×2 ribbing

Hand-

(knit 8, work 20 stitches in cable pattern, knit 8 ) for 28 rounds

round 29- knit 8, work 20 stitches in cable pattern, place next 7 stitches on waste yarn or stitch holder, cast on 7 stitches before knitting remaining 5 stitches to complete the round. This is now your right handed mitt.

Continue working hand stitches as before, until you have completed 43 rounds of the cable pattern.

Knit 5 rounds of 2×2 ribbing, bind off in rib pattern.

Thumb-

Put 7 held stitches back on a needle.

Pick up 8 stitches along the cast on edge behind the 7 held stitches.

With right side facing, begin knitting the 15 thumb stitches in stockinette stitch in the round, for 6 rounds.

On the first of the next 5 ribbing rounds, either decrease by 3 or increase by 1 stitch to get the 12 or 16 stitches you’d need to knit 2×2 ribbing.

Knit 5 rounds of 2×2 ribbing, bind off in rib pattern.

Weave in ends.

Repeat for the left glove working the thumb on the opposite side.

Thursday, October 11th, 2007

Mod legwarmers

My legwarmers are done!

greenlegwarmersdone1.gif

But I guess that picture’s not exactly helpful.

greenlegwarmersdone2.gif

I’m just trying to demonstrate that legwarmers can be worn without being obnoxious. A number of people, when I say I’m knitting legwarmers, raise their eyebrows and change the subject.

It’s not the 80s. They don’t have to be worn outside of pants. Come on.

If you, like me, want cozy legs this winter, and mod rectangles appeal to you, and you aren’t afraid of scorn and scoffing while knitting something called legwarmers

then this is for you-

Size 4 needles.

Sport weight yarn. (I used 3 1/2 balls of Frog Tree Alpaca, though the alpaca doesn’t stay up well).

Cast on 64 stitches, join into the round.

1×1 ribbing for 8 rounds.

Mod stitch pattern-

rows 1-6, (P4, K2, P10) 4x. Place stitch markers between pattern repeats.
rows 7-8, Knit
rows 9-14, (K2, P14) 4x.
rows 15-32, (K2, P2, K2, P2, K6, P2) 4x.

repeat these 32 rows 5x, then work rows 1-14 again.

Knit 8 rows of 1×1 ribbing, and bind off in rib pattern, moderately loose.

And you can join with me in defying stereotypes. One warm and happy leg at a time.

greenlegwarmersdone3.gif

Monday, March 13th, 2006

Cuuuuuuuuute!

image

image

Every time I look at it, I think about Shrek 2, when he’s talking about Puss’s “wee lit’le boots!”

1/2 ball of Koigu. (My hat weighs .8 oz, or 24 grams).

Size 2, bamboo double pointed needles

Cast on 100 stitches.

Work in 1×1 ribbing until hat is 3 inches from bottom, (not the cast on), with brim flipped up the desired amount.

Start decreases-

1. (work 9 in ribbing, k2tog), end p1.

2. Work 1 round, working stitches as they are.

Continue the two decrease rounds, working 1 less stitch between k2tog each time until you have done (work 4 in ribbing, k2tog), end p1. Omit the in-between round and just work decrease round until you have 10 stitches. Cut yarn, leaving a long tail, and thread through the 10 live stitches with an embroidery needle. Weave in ends.

I haven’t tried this on a baby yet, but with the brim able to be adjusted higher or lower, and the generous stretch of the ribbing, I think it’ll fit good.

The Superman blanket is done, and my friend and I found what we think will be a good backing on Saturday. It’s in the drier now. You’ll see it tomorrow.

Twice last night, while trying to roll over in bed, my pelvis popped/cracked. Once on each side, like my legs wanted to fall out. It was excruciating, and I’m still sore. Before bed, I was having some serious “warm up” contractions, and I walked around through them, just to get things progressing a bit.

Pretty exciting.

Monday, January 16th, 2006

Zigzag Lace Scarf Pattern

image

Yarn– I used Angora by Elsebeth Lavold. 4 balls for the body, and 1 ball for the edging and fringe. Each ball of Angora gave me about 19 inches of scarf length.

I think this scarf would look great in a soft, worsted weight yarn that doesn’t bloom like angora to preserve more stitch definition. It is still luscious in the Angora, if you choose that route.

Needles– size 9 for body, a 36 inch circular in a smaller needle (I used a 7) to pick up side stitches, and a 36 inch circular in 10 1/2 to knit the edging.

A large crochet hook to help with fringe.

Gauge– don’t have one

Finished measurements– My scarf is 7 1/2 inches wide, and 77 inches long, including fringe

PATTERN

Cast on 33 stitches loosely.

Row 1- K5, (k2tog, yo, k2) repeat to last 4 stitches, k2tog, yo, k2.

Row 2- K1, (p2, yo, p2tog) repeat to last 4 stitches, p3, k1.

Row 3- K1, (k2, k2tog, yo) repeat to last 4 stitches, k4.

Row 4- K1, p4, (yo, p2tog, p2) reapeat to last 4 stitches, yo, p2tog, p1, k1.

Row 5- K2, (yo, slip 1 stitch, k1, psso, k2) repeat to last 3 stitches, k3.

Row 6- K1, p3, (p2tog tbl, yo, p2) repeat to last stitch, k1.

Row 7- K4, (yo, slip 1 stitch, k1, psso, k2) repeat to last stitch, k1.

Row 8- K1, p1, (p2tog tbl, yo, p2) repeat to last 3 stitches, p2, k1.

Repeat these 8 rows as many times as you like to get the desired length. You can bind off in 2×2 ribbing after row 4 OR row 8.

For edging, hold scarf sideways with front facing you. Along the top edge, with the smaller circular needle, pick up the vertical bars made by the selvedge stitch. Pick up stitches in the same place each time to maintain a uniform appearance. It ends up being about 1 stitch picked up for every 2 rows knit.

With the 10 1/2 needle, loosely work 2 rows in stockinette, (knit 1 row, purl 1 row), then loosely bind off in stockinette, causing the edge to roll towards the right (front) side of the scarf. Repeat on the other side.

For fringe– each fringe is made of 8, 7 1/2 inch strands of yarn. On my scarf, I have 9 fringe on each end.

Trim the fringe to even them when finished.

Now I need to make/write up the matching hat!

Key

k2tog- knit 2 stitches together

yo- yarnover

p2tog- purl 2 stitches together

tbl- through back loop

psso- pass slipped stitch over the last knitted stitch

Thursday, November 17th, 2005

Esther Williams Hat pattern – Synchronized Knitting

image

Materials

1 skein Lamb’s Pride worsted weight yarn (mohair/wool blend)
size 8, 16 inch circular needle, plus double points
stitch marker
size E crochet hook for edging
embroidery needle to weave in ends

Gauge

18 stitches and 21 rows in stockinette stitch

Stitch Guide

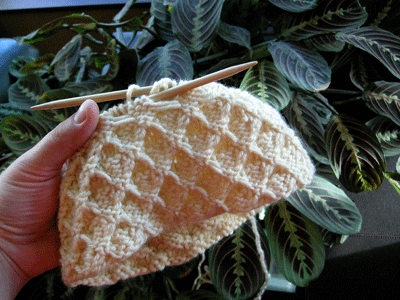
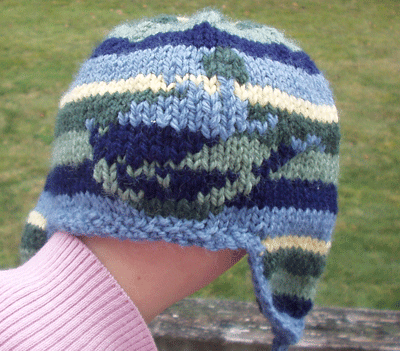
LSYO- Lift Stranded Yarns Over. With right needle, from front to back, lift the two stranded yarns. Knit the next stitch, which will be the center of the three knit stitches. Pick up the stranded yarns with left needle and lift off of right needle.

TDS- Triple Decrease Sequence. (This only happens on either round 5 or 11 in pattern, when the strands need to be lifted. This will begin at the first of the three knit stitches). Lift the two stranded yarns in the usual way. Slip 1st knit stitch as if to knit, knit next 2 knit stitches together, pass slipped stitch over and off of the right needle, pass the stranded yarns over and off the right needle. This will make 1 stitch out of 3. Next, on the three purl stitches that follow, slip one as if to knit, knit two together, pass slipped stitch over. Lastly, repeat the first decrease on the next three knit stitches. You have made 3 stitches out of 9.

SSD- Single Set Decrease. This divides up the decreases mentioned above into different parts. When working the purled stitches, simply slip 1, knit 2 together, and pass the slipped stitch over. When working the knit and stranded stitches, decrease as outlined above. An SSD makes 1 stitch out of 3.

Pattern

Cast on 96 stitches. Place marker at beginning of round as you join into the round.

round 1- (purl 3, slip 3 w/ yarn in front)
round 2- same as round 1
round 3- (purl 3, knit 3)
round 4- same as round 3
round 5- knit 4, LSYO, (knit 5, LSYO), knit 1
round 6- knit 3, purl 3
round 7- (with yarn in front, slip 3, purl 3)
round 8- same as round 7
round 9- knit 3, purl 3
round 10- same as round 9
round 11- knit 1, LSYO, (knit 5, LSYO), knit 4
round 12- purl 3, knit 3

Work rounds 1-12 three times.

Work rounds 1-4 once more.

1st decrease round- Work 21 stitches in pattern, TDS, work 39 stitches in pattern, TDS, finish round.

Work pattern rounds 6-10.

2nd decrease round- work 6 stitches in pattern, TDS, work 39 stitches in pattern, TDS, finish round.

Work pattern rounds 12, then 1-4 again.

3rd decrease round- Work 27 stitches, TDS, work 27 stitches, TDS.

Work rounds 6-12 even in pattern, no decreasing.

Work rounds 1-4.

4th decrease round- (knit 3, TDS) all the way around.

Work rounds 6-10.

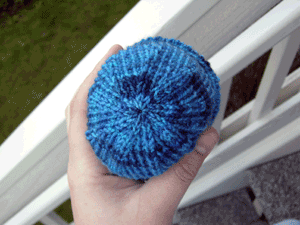
5th decrease round- SSD all the way around. You will have 10 stitches left at this point.

Last round- knit 1, purl 1 all the way around, cut yarn leaving a long tail, weave in ends.

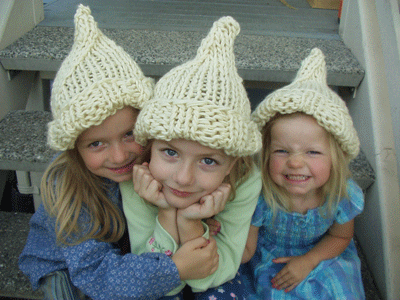
Edging– (I’ve never written crochet instructions, so be kind).

(Sl, hdc, dc, tr, tr, dc, hdc) for those of you who know what you’re doing. If you’re like me and would not have the foggiest idea what that means, I’ll try to spell it out in the babbling that follows.

The stitch pattern in the hat repeats every 6 stitches. The bottom most knit stitch under the first lifted strands is where we begin with our first crochet stitch. Holding hat upside down (see?) with right side facing, and after securing your yarn, stick your crochet hook in that stitch from front to back.

Work a slip stitch.

In the next knit stitch which is hard to see because it’s semi-hidden behind the strands, work a half double crochet.

In the next knit stitch, work a double crochet.

Now, going between the stitch you just worked and the next knit stitch, which will be the center knit stitch, do a triple crochet. Do it again on the other side of the center knit stitch.

In the next knit stitch, work a double crochet.

In the next knit stitch, which is again semi-hidden under strands, so you have to dig for it, work a half double crochet.

You’re ready to begin again in the stitch directly under the picked up strands with a slip stitch.

Notes– This pattern will probably undergo some updates and changes as more of you knit it and comment, particularly the crochet bit, since I have almost no idea what I’m talking about. I may try to illustrate somewhat for you next week, with up-close pictures and arrows, but ultimately, I suggest having someone show you how to do it.

I’m the blind, leading the blind on this one.

But take my word for it, it’s REALLY not hard.

For a shorter hat, work rounds 1-12, 2 1/2 times before beginning your decreases instead of the full 3 times. It’ll change the specific numbers a bit, but you’re smart. You can figure it out.

On rounds 1&2, and rounds 7&8, when you’re making the strands, don’t pull the yarn tight. You want to leave enough yarn to span the three slipped stitches comfortably.

The knitalong– Nate suggested we do some Synchronized Knitting. This means we’re going to be knitting together. Meaning this knitalong will be short. I’ll announce a start date and duration on Monday, and will post it on this post as well. I’m totally out of time right now. Gotta go.

UPDATE- The knitalong will run from November 21st to December 16th, 2005.

Button

image

Good luck, have fun!

Thursday, May 26th, 2005

Just for you, baby

I finally wrote out my pattern for Lauralund (same old picture). Lauralund is a liberal takeoff of Klaralund, which has been extremely popular on the blogs. I have changed it significantly in that it’s now a cardigan, knit with bulky weight, there is no garter stitch anywhere, and the ONLY factors I used to determine size were a tape measure and my body. That being said, I would HIGHLY recommend doing the same before knitting your own. Even if you want a 42 inch bust sweater like mine, you should measure your shoulders. I have very tall shoulders (remember the bra fitting posts?), and the shoulder height will make a huge difference in how this sweater fits.

Yarn– Lopi wool purchased out of a forgotten warehouse. It’s old, hairy, and fabulous. But it’s still Lopi. And I “think” I used 8, 3.5 oz balls of it. Sorry about that.
Needles– size 10 1/2 for sweater, and double points for i-cord button loops. On the sweater use straits or circular, but it’s flat knitting. A 24 or 36 inch circ would be fine
Gauge– 12 stitches per 4 inches. This is the BLOCKED gauge. At this gauge, my fabric drapes beautifully. And it draped better after being blocked.
Other– groovy buttons. I used 2 toggle style bamboo buttons.

Finished measurements-

42 inch bust
16 1/2 inches from armpit to bottom
18 inches from armpit to sleeve cuff
Overall length is 26 inches when laid flat, and subjective on body. I was getting about 28 inches from shoulder to bottom of sweater.

Lauralund is comprised of 5 large rectangles with no shaping whatsoever. Two rectangles make up the front (because it’s a cardi, one on each side), one rectangle is the back, and the sleeves are freaky long to go up over the shoulders and make the neckline. You sew the top sides of the sleeves to the fronts and back to make the top part of the sweater. Make sense? If not, read the seaming instructions.

Because the construction is so simple, it will be very easy to customize her to your size. Just get a good, BLOCKED gauge swatch, measure yourself, and go from there. I would suggest reading all of my notes before beginning your sweater.

PATTERN FOR LAURALUND

Fronts- make 2

-cast on 33 stitches
-work 4 rows in 1×1 seed stitch
-switch to stockinette stitch, leaving 3 stitches on one side in seed stitch as a faux button band. Work until entire piece measures 15 inches.
-Resume seed stitch for 12-13 rows, bind off in seed stitch

Back- make 1

-Cast on 60 stitches
-work 4 rows in seed stitch
-switch to stockinette stitch and work until entire piece measures 15 inches
-resume seed stitch for 12-13 rows
-bind off in seed stitch

Sleeves- make 2

(starting at top of sleeve)
-cast on 52 stitches
-work 3 rows in seed stitch
-work in stockinette until entire piece measures 25 inches
-work 21 rows in seed stitch
-bind off in seed stitch

Block all pieces. Seam, seam, seam!

Ok, ok. Lay out a front, vertically. Take one of the sleeves and lay it horizontally across the top, bound off edge of the front. Line up the top of the sleeve to the inside edge (the faux button band) of the front to make a straight line all the way down the front of the sweater. Seam the side of the sleeve to the top of the front. Do the same for the other side. Lay out the back and measure and mark the top center. Sew the other side of the sleeves to the back as you did for the front. Now seam up the sides, through the armpit, and down the sleeves to the cuff.

Then make two 3 stitch i-cords to loop around buttons. Sew the loops to one side and the buttons to the other.

Optional- sew up 5 or so inches of the sleeves at the back to close it. Read my notes for further discussion.

Notes- here’s where I ramble…

First of all, I will tell you again to measure your shoulders. Don’t worry about getting it exact. The sweater is knit in rectangles, so draw a line around your body at the armpits. Between your neck and your shoulder, measure (if you’re lucky, have someone else measure) from the armpit line in the front, to the armpit line in the back. That is how wide you want your sleeves to be. You don’t want them too wide, or the whole thing will look saggy. Saggy is NOT what we’re going for.

I know that bulky yarn sweaters aren’t supposed to be tight fitting, but I think this sweater needs to be snug to look right. It needs to be snug on the bust. The arms are very loose, and the front hangs open, so the bust needs to be the spot that fits. My bust with bra and t-shirt measures 48 inches. My Lauralund measures 21 inches wide when laid flat (or 42 inches around). It is admittedly a bit too small, but not by much. If it were 48 inches around, it wouldn’t fit as well. The first time I made her, she was WAY too big, and it looked awful.

As for the sleeves… I love loooooong sleeves. Lauralund has them. I cast on for the sleeves a the top (or neckline) because that way, I can continue knitting the sleeves until I think they’re long enough even after they’re seamed or pinned onto the sweater. It works out great.

Next, in the Klaralund pattern, you are supposed to sew up 5 or so inches of the sleeves to close up the back. This can be dangerous. I don’t remember where I read it, I think it was on Purlygirls, but someone was talking to the pattern writer and she said that the “chest drooping” problem that a lot of people were having with Klaralund was because of the sewing up of the back. The sweater in the picture of the pattern isn’t sewn that way, they added that instruction later. The first time I knit Lauralund, when she was much, much bigger and looked awful, I noticed a huge difference in how it fit before and after the back was sewn. Tight like mine is now, it isn’t as noticeable, but if it were looser, I think I’d rip out the seam up the back. FYI.

There she is. Thank you for waiting so patiently. I know some of you have been a bit anxious. And hopefully, I didn’t leave out anything vital.

I know today is knit-along day. I really wanted to do some blog reading this week to look for updates, but I’ve been very busy. This week was quite eventful. Not to mention the wrapping up of eventful things that happened LAST week. So I’d love to give our knit-along day the attention it deserves on Monday. Is that ok with everyone? Feel free to post anything you’d like to today’s post. That way, I can feature you on Monday. Sound good?

Wednesday, February 9th, 2005

Countdown- 2 days ’til spinning class

Yesterday, I did a bunch more stitch markers, knit a cute little flower pin…

image

and started dreaming of what to do with this.

image

This, my friends, is my first ever skein of Manos del Uruguay. I have wanted some since discovering it months ago. Last week, Nate surprised me with a skein. He’s so sweet. Isn’t it lovely? Nate suggested making another pair of fingerless mitts because I am really enjoying the first pair. I think it sounds like a fabulous idea. What do you think? Mmmmmm, Manos.

How to make the flower- Using loopy mohair, and size 6 double points, I cast on three stitches. I increase on each end of each row until I have 9 stitches. Then I knit three rows. Then I start decreasing by SSK at the beginning of each row, and K2tog at the end of each row until 2 stitches remain, bind off.

Make 5. sew the pointy ends together. Make a bobble by casting on two. Knit the two together as you knit/purl 4 stitches into the one being knit together. Work 5 rows in stocking stitch. On next round, slip 2. Knit 2 together, pass two slipped stitches over the knit stitch. Pull yarn through so there are no live stitches. Tie the two ends together and fasten to inside of flower.

Leaf- with hairy mohair and size 6 double points, cast on 4. Work about 10 rows of i-cord. Begin knitting flat in garter stitch, increasing each end of every row until you have 14 stitches (I think. Pick a width you like). Knit 10 or so rows, continuing in garter stitch. Begin decreasing by knitting to the center, slipping a stitch, k2tog, pass slipped stitch over the knit stitch. Do this every other row ’til you get to a point, pull yarn through.

Sew it all together and fasten a pin.

Tuesday, February 8th, 2005

Beads, beads, and more beads

image

I’m up to 10 pair made. And I’m curious, do you ladies want a matched set? Or would you rather have two different markers? Let me know.

So, the tutorial. I took pictures yesterday, and before I show them to you, I have to say, I’m SO novice at this! Those of you who are real beaders are going to cringe, I’m sure, BUT, there was enough interest that I thought I’d post how I make them. The only instruction I’ve had was an email tutorial by my friend Yvette, who lives in France. (And I still SO appreciate it. You’ve been so good to me, Yvette. Thank you).

First, I take a length of 20 gauge wire about 2 1/2 inches long. I bend one end up a little bit, to make a loop, and I crimp the end to the vertical wire to make it tight.

image

Pictured above is the only tool I have, which is a combination pliers/wire cutters.

Next, I slip on beads, making sure that the bottom bead covers the loose end.

image

Then I use the pliers to put a 90 degree bend in the wire, a bit above the beads.

image

With a knitting needle held above the wire, I bend the wire around the needle. I’ve been using size 10 1/2.

image

Tightly wrap the remaining wire around the vertical wire, ending tightly above the beads so they don’t wiggle around and rise above the open end on the bottom. Crimp end tightly to avoid snags.

image

There you have it. Loads of fun. Yet another way to play with color. And I have to tell you, whenever I slip one as I’m knitting, I smile with glee.

Thank you all for the compliments on my projects the past few days, with Lauralund, the stole (soon to be shrug) and the stitch markers. You are all so kind.

Sunday, October 31st, 2004

Hayden Hat-along with me

image

It’s a knitalong! We even have a button to take in the sidebar! Please copy the image to your own server, instead of stealing bandwidth from mine!

If you’d like to participate, please notify me by leaving a comment to this post. I am not a whiz at the sidebar yet, so it may take me awhile to do you knitalong justice, having your names listed and linked there. I am designating Fridays as the update day for this knitalong. If you have pictures you’d like me to post for you, or if you are a blogger and I can link to you, I will be doing so on Fridays. Feel free to email me at any time if you have questions or problems with the pattern, or to notify me of your progress for inclusion in the Friday posts.

I am going to be knitting another one along with you. The pattern follows. I am happy to freely share this pattern, however, if you take and use it for lucrative, commercial purposes without first discussing it with me, I will be excessively annoyed, so please don’t do it.

Here are some links to pictures that might be helpful. Loads of swatches for color ideas, and a super close-up for stitch reference.

Yarn- Plymouth Encore, worsted weight. 3 or 5 colors. (Wool/Acrylic blend)
Needles- size 8, 16 inch circular, and double points
Gauge-18 stitches to 4 inches/ 10 centimeters in pattern

Gauge swatch-

co 19 stitches

Knit 1st and 2nd row.
Row 3- K1, (slip 1 stitch as if to purl, K1) to end.
Row 4- K1, (bring yarn forward, slip 1 stitch as if to purl, return yarn to back of work, K1) to end.
Knit 5th and 6th row.
Row 7- K2, (slip 1 stitch as if to purl, K1) 8 times, K1.
Row 8- K2, (bring yarn forward, slip 1 stitch as if to purl, return yarn to back of work, K1) 8 times, K1.

Repeat these 8 rows as often as you’d like, changing colors every 2 rows, not including the cast on row, so your first color change will be starting row 3. Remember that your swatch is 19 stitches, and you’re trying to get gauge of 4 inches at 18 stitches. Don’t kill yourself over gauge. If you’re close, you’re fine. Everyone’s head is shaped differently anyway.

Finally, a note about color- I have knit this hat with five colors, and with three colors. It is nice either way. The pattern is not specific on which color to switch to. Basically, pick your colors, choose the order you want them to appear, and keep them in that order, switching colors every two rows. So you will either be knitting (2 rows A, 2 rows B, 2 rows C) repeat, or you will be knitting (2 rows A, 2 rows B, 2 rows C, 2 rows D, 2 rows E) repeat. Remember that your cast on row doesn’t count as a color row. Also note that as a color repeats, it will look different, alternately. Once it will be the slipped stitch, next, it will be the knit and then purled stitch. If this confuses you, just ignore me. You’ll see what I mean.

Hat Pattern-

Cast on 98 stitches. Place a marker and join into a round, being careful not to twist.

*Knit 1 round. Purl 1 round.

CHANGE COLORS
Next row- (K1, Slip 1 as if to purl) all the way around.
Next row- (P1, yarn in back, slip 1 as if to purl, yarn forward) all the way around.

CHANGE COLORS
Knit 1 round. Purl 1 round.

CHANGE COLORS
Next row- (slip 1 as if to purl, K1) all the way around
Next row- (slip 1 as if to purl, yarn forward, p1, yarn in back) all the way around

CHANGE COLORS* repeat these 8 rows until your hat measures 4 to 4 1/4 inches tall (taller if you wish), ending with a Knit round.

Cap decrease begins-

Next round- P2 tog, P8, P2 tog, (P10, P2 tog) 7 times, P2 tog.
Work three rounds even in pattern. Ending once again with a Knit round.
Next round- (P9, P2 tog) all the way around.
Work three rounds even in pattern.
Next round- ( P8, P2 tog) all the way around.
Work three rounds even in pattern.
Continue decreasing in this manner, resulting in 1 less stitch between your P2 tog each decrease round, until you have 40 stitches remaining.

Next round- (Slip 1 as if to purl, K1, Slip 1 as if to purl, K2 tog) all the way around.
Work two rounds even in pattern.
Next round- (P2, P2 tog) all the way around.
Next round- (K2 tog, Slip 1 as if to purl) all the way around.
Work two rounds even in pattern.
Next round- (P2 tog) all the way around.

Cut yarn, leaving a long tail. With a blunt-tipped embroidery needle, run tail through remaining live stitches, pull tight, and weave in ends.

Pattern updated 11-03-04 thanks to Kim for the correction. Also, she had some additional questions that I answered in the comments which might be helpful to you.
Pattern updated 11-09-04– a clarification on the initial decrease rounds, no change to the pattern itself.